![]() Steps
Steps
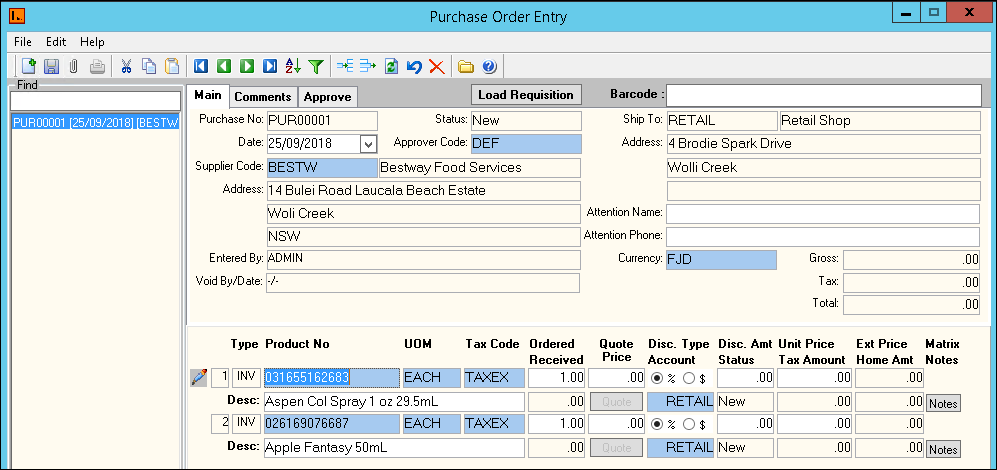
Open the PO Entry screen and fill in the following information:
Fields
Description
Main Tab
Header Section
Supplier Code Double click supplier code and select the supplier you are creating purchase Order for. Name / Address
These are automatically populated once the supplier code is selected. This is setup in the Supplier menu. Date The date the Purchase Order is created. Ship to Location Double click Ship To Loc field and select the location where you will receive the items ordered. Loc Name / Loc Address These are automatically populated once the Ship to Loc is selected. This is setup in the Location menu. Attention Name / Phone These are automatically populated once the supplier code is selected. This is setup in the Supplier menu and can be changed on this screen. App Code App. Code shows the authority approving the purchase. The default Approval code is set in the User Login menu in the Operational tab. Currency Currency the PO is created using. PO Amt The system calculates this based on the unit cost and quantity PO Tax Amt The system calculates this based on the PO Amt and the tax code specified. PO Total Amt The system adds the PO Amt and PO Tax Amt. Detail Section
Type This will be displayed as INV for inventory items and MISC for Non Inventory items. Product No Double click and select the item you want to purchase. UOM Confirm that the UOM information is correct for the items ordered. Tax Code Confirm that the Tax information is correct for the items ordered. Ordered Enter quantity for the items being ordered. Disc Type Specify if the Discount is by percentage or amount if the supplier is giving discounts on the items ordered. Disc Amt Enter Discount value. Unit Cost Enter the price per unit.
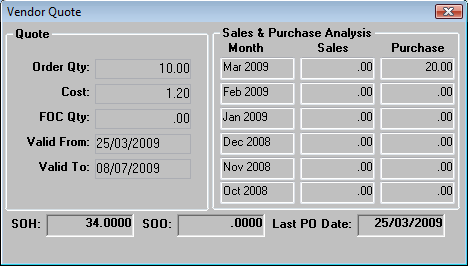
Unit cost is also depicted from valid supplier quotes.
If the valid date period for the quote has ended, the system depicts the unit cost used in the last purchase oder (Active or closed Purchase Order) under the supplier.
If the above is not met, the system checks for the Inventory Cost method and gets unit cost based on the setup. However, if no cost is indicated at setup then the unit cost is zero.
Ext Price This is calculated by the system: Unit Cost * quantity ordered Desc This is automatically populated once the product number is selected. Received This field is updated by the system once the Receive Purchase is completed for the Purchase Order. Quote If a Supplier Quote is created for this item, the Quote font will appear Green.
This screen shows the following information:
- the supplier quote details
- available quantity
- Stock on Purchase Order
- Sales and Purchase History for the last 6 months for the item
- Last date a PO was created for the item
Note Use this field to enter additional notes for each line item. Account No Double click and select the AP posting codes for items you purchase. Status The status remains “New” for the product being ordered until the product is approved in the PO Approve form. The status will then change to “Approved”. Tax Amount This is calculated based on the Tax Code selected. Home Amount This is you Company's Home Reporting currency amount. Comments Tab
Comments Enter additional information for the Purchase Order Approve Tab
Approve This tab shows details of the user who has approved the Purchase Order.