Pay Processing allows users to create and
manage all pays for a organisation.
Notes
-
Set
the access for "Pay
Processing" as "Active" under "
Role
Menu Access
" to allow users to view records.
-
Set the access for "Pay
Processing- Verify Pay" and "Pay Processing- Create Pay" as "Active" to allow users to verify and
update pay.
-
Enable "Allow Add",
"Allow Edit" and "Allow Delete" access for a user to make
changes.
Enable process "SYS001" under "Linkweb - Company
Administration - Processes".
Prerequisites for Pay Processing:
Create the standard pay for all
employees.
Steps to create a
Pay:
-
Click on the
"Green Plus" sign to add a record. This will open the "Edit Form".
-
Enter below
details
-
Type - Select the pay type from
the list.
-
Configure the rules for each pay
type under Payrun
Type Configuration before creating a pay. Only the
configured values will populate in the pay.
-
Team - Select the pay team to create the pay for a specific "Pay
Team". This will create the pay for all employees in the selected "Pay
Team".
-
Employee - Users can select to create
the pay for a
specific "Employee".
-
Users can
add employees to the pay through the "Add Employees"
option under "Employee List". Refer to Figure
1.
-
To create the pay for all employees do not
filter the "Territory", "Branch", "Cost Centre" or
"Employee".
-
Territory - Users can select to create
the pay for a specific "Territory". This will create the pay for all
employees in the
selected "Territory".
-
Branch - Users can select to create
the pay for a specific "Branch". This will create the pay for all
employees in the
selected "Branch".
-
Cost Centre - Users can select to
create the pay for a specific "Cost Centre". This will create the pay for
all employees in the
selected "Cost Centre".
-
SDR Rate - Enter the "Special Drawing Right" rate
for the pay. This is
applicable
for specific
countries like Australia.
-
Bank Date - Enter the "Banking Date"
for the pay.
-
Save. Click
the "Floppy Icon".
-
The initial status of the record
will
be "Queued". Background process "SYS001" will compute
the pay values.
-
The status will be updated to
"Active"
once the pay has been created. Refer
to Figure 1.
-
Edit Pay -
Users will be able to only edit "Active" pays. Note: Bank Components and entries that have been imported
(contains an Import Reference) cannot be edited.
-
Click on the "Grey
Arrow" to expand into the details
of
the pay. This will list the employees
in the pay.
-
Expand the employee record.
This will
load the pay details for the
selected
employee. Users can edit the "Quantity". Refer
to Figure 2.
-
Override Quantity:
-
Override Quantity should be "Ticked" in
scenarios
where users need to manually change
the
standard pay quantity. For example, a change
in superannuation amount.
-
This record will
be
highlighted in red to indicate values have
been manually changed.
-
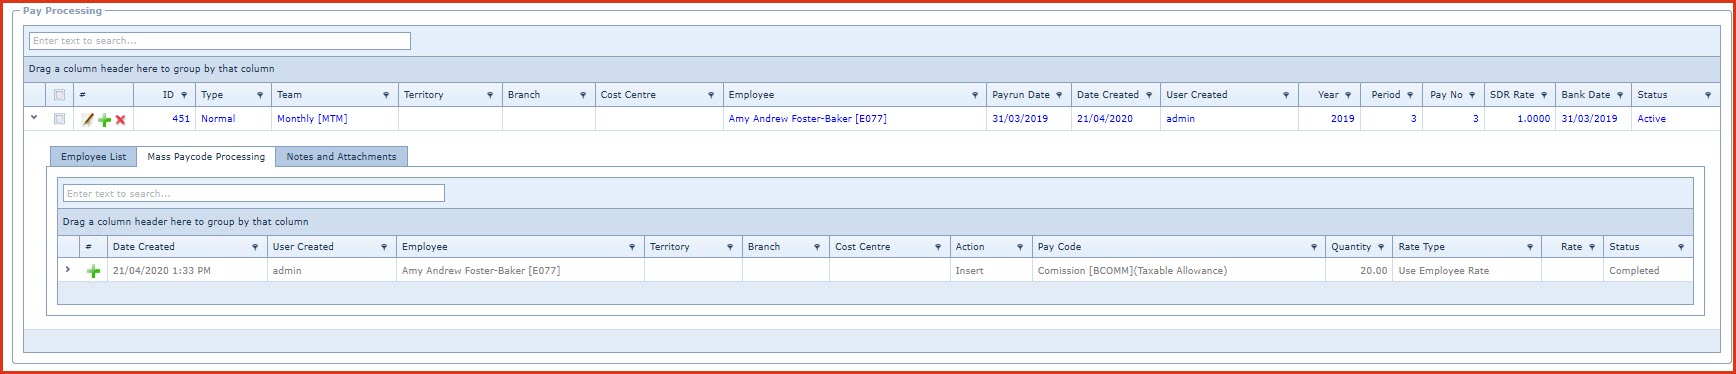
Mass Paycode
Processing - This is used to "Add ", "Delete" or "Modify" pay components for multiple employees
with the same rate or quantity. For example, paying $100.00 bonus for all staff. Refer
to Figure 3.
-
Click on the "Green Plus" sign on the "Mass Paycode Processing" tab. This will open
the "Edit Form"
-
Enter below details
-
Employee -
Users can select to modify the pay for a
specific
"Employee".
-
This
list will only load employees who are in
the
pay.
-
Territory - Users can select to
create the pay for a specific "Territory". This will create the pay for
all employees in the selected
"Territory".
-
Branch - Users can select to create
the pay for a specific "Branch". This will create the pay for all
employees in the selected
"Branch".
-
Cost Centre - Users can select to
create the pay for a specific "Cost Centre". This will create the pay
for all employees in the selected
"Cost Centre".
-
Action - Select the option for mass pay
processing:
-
Insert - Insert will add the
selected paycode into the
pay.
-
Update - Update will modify the value of the
selected pay
code.
-
Delete - Delete will remove the
selected paycode from the
pay.
-
Paycode - Select the paycode that needs to be
amended.
-
Quantity:
-
Enter the quantity as 1 if a fixed amount is
to be
paid.
-
Update the quantity with hours to pay if the
employee rate is used for
payments.
-
Rate Type - Select the
rate type:
-
Use Employee Rate - This will use the
effective rate from the employee profile to calculate the
pay value.
-
Use This Rate - Users can define a fixed
amount
to pay.
-
Rate - Enter the rate for payment when rate
type is "Use This
Rate".
-
Reason - This is an open text field. Users can
enter referential
details.
-
-
The notes is updated with
error log during pay
processing.
Commands
Commands are used to
define the payroll processing
workflow.
Workflow "Pay
Processing Approval" is used for
alerts, approving or rejecting
pay.
-
Verify
-
Security access: HR332-3 - Can "Verify Pay" in menu
"Payroll Processing -> Pay Processing"
-
Verify pay does the
following:
-
Recomputes the pay values such as tax and
super
-
Validates
Employee profile rate is different from pay
rate.
-
Validates
Deduction is more than deduction
threshold
-
Submit - Submit the
pay for review and
approval.
-
Approve - Approve the pay. Once approved no
amendments are allowed. The approver
can still reject the
pay.
-
Reject - Reject
the pay. Pay can be
amended and resbumitted for
approval.
-
Close - Click on the "Close Pay" button to update pay.
This
was update payroll reports and
journals with the pay
values.
Plugin
Plugin
"PAY001"
-
Use this plugin to send email to the approvers with pay
reports. The content of the email can be configured in menu: "Document
Template
-> Pay Processing Approval
Alert"
Figure 1: Pay Create
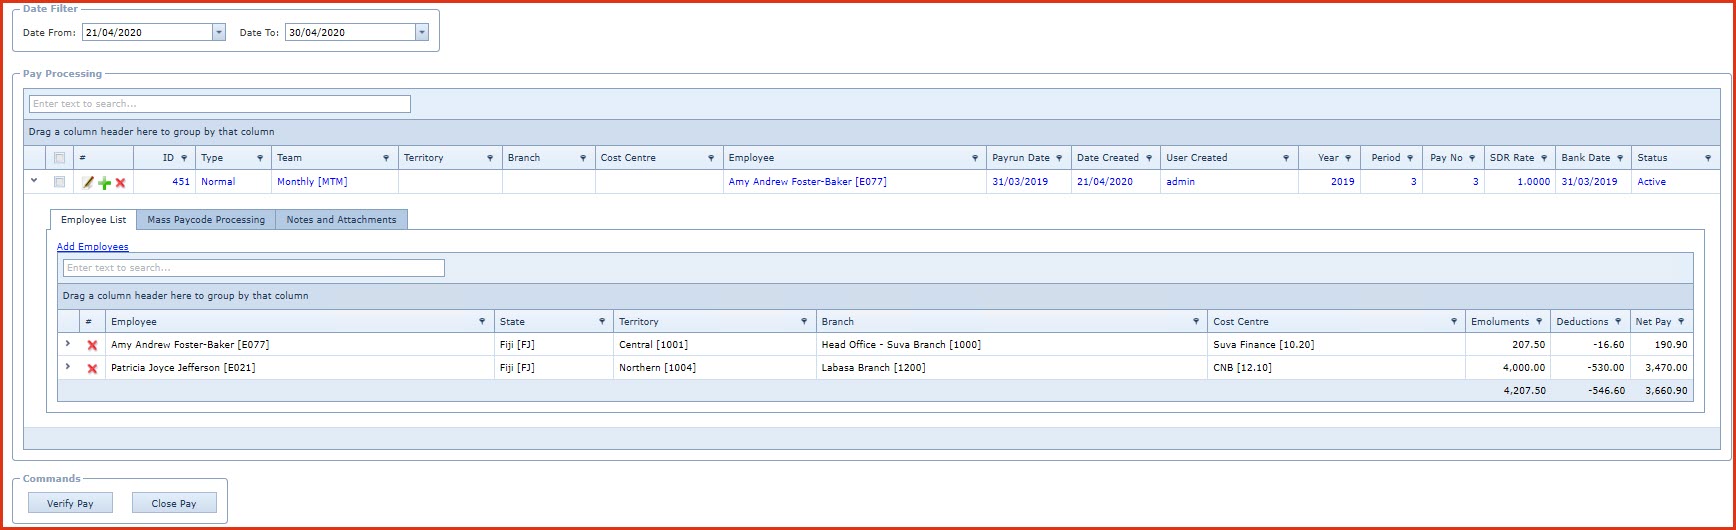
Figure 2: Edit Pay
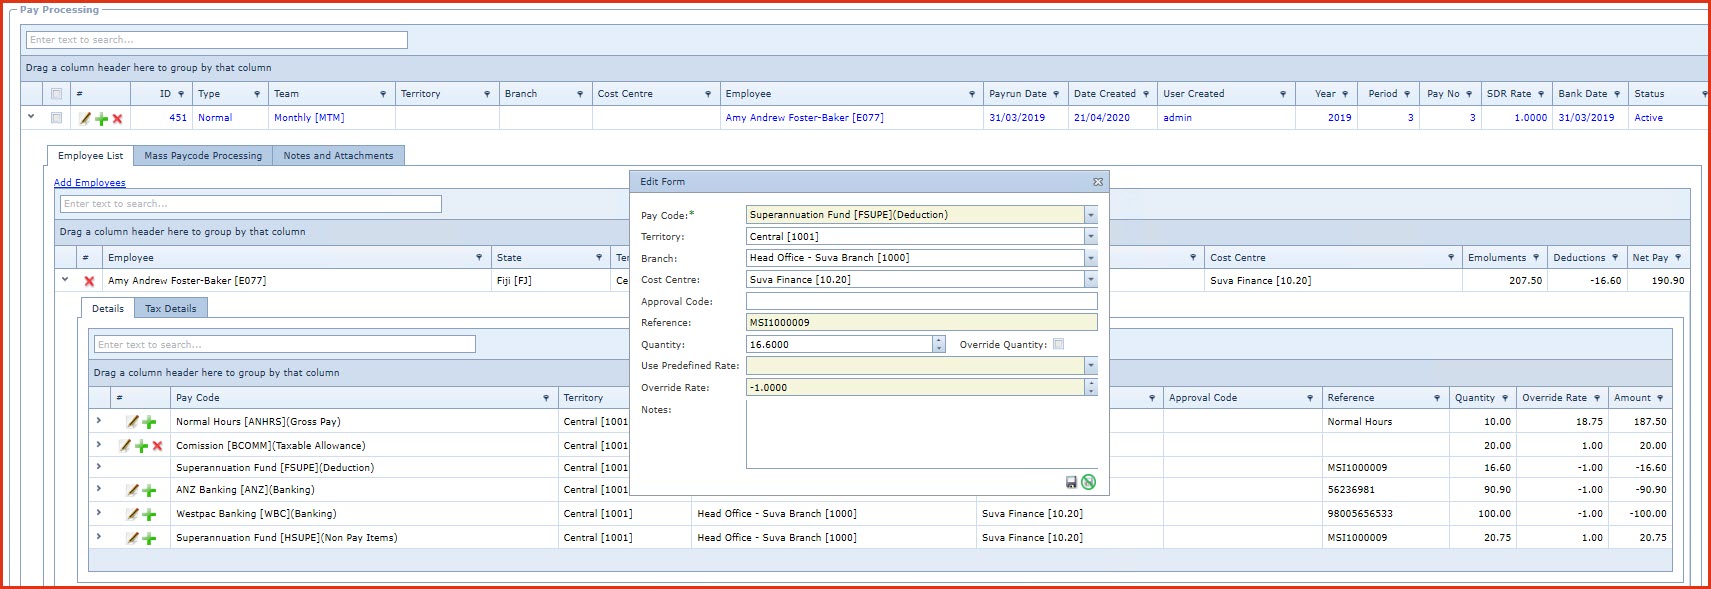
Figure 3: Mass Paycode Processing