Back Pay is the difference amount to be paid to an employee
to account for the shortfall in the wages already paid.
For Example
-
Employee E001 had a promotion in January
2018 with a salary increase. Th employee rate changed from
$37.24 per hour to $40.00 per hour. However, since his new contract was
delayed and HR did not update the system, the pay for January was
created with the existing rate. In February, a Pay Back can be created to
pay the difference for the pay that was created in
January.
Notes:
-
Set the access for "Back Pay Schedule"and
"Back Pay Schedule Report"as "Active" under "
Role Menu Access
" to allow users to view records.
-
Set the access
for "Back Pay Schedule - Create Pay" as "Active" to allow users to create
a Back Pay.
-
Enable the "Allow Add", "Allow Edit" and "Allow
Delete" access for a user to make changes.
-
Enable process "SYS001" under "Linkweb
- Company Administration - Processes".
Steps to create a Back Pay:
-
Click on the
"Green Plus" sign to add a record. This will open the "Edit Form".
-
Enter below
details
-
"Pay Date
From" and "Pay Date
To" - Back pay will be created for all pays in the selected date
range.
-
Rate
Type - Select the rate type to be used to calculate the back pay
rate:
-
Difference
- The rate to be paid is calculated with the difference of "This Rate -
Paid Rate". For example, if paid rate was $37.24 and new rate
is $40.00 then Back Pay rate will be $2.76. "This Rate"
is defined in number 3 below.
-
Percentage of Rate
Paid - The rate to be paid is computed based on the set
percentage. For example, if paid rate was $37.24 and percentage
for "Back Pay" is set to 5 then back pay will be created with rate $1.862
(5%*37.24). The percentage is defined in number 3
below.
-
Value -
The rate to be paid is calculated using the defined value. For example, if paid rate was $37.24 and value for
"Back Pay" is set to 5 then back pay will be created with rate $5.
-
Rate -
Enter the back pay rate, percent or value.
-
Pay
Team - Select the pay team to create the back pay for a specific "Pay
Team". This will create the pay for all employees in the selected "Pay
Team".
-
Territory
- Users can select to create the back pay for a specific
"Territory". This will create the pay for all employees in the selected
"Territory".
-
Branch - Users can select to create
the back pay for a specific "Branch". This will create the pay for all
employees in the selected "Branch".
-
Cost
Centre - Users can select to create back the pay for a
specific "Cost Centre". This will create the pay for all employees in the
selected "Cost Centre".
-
Employee - Users
can select to create the pay for a specific
"Employee".
-
Users can add employees into the
schedule under the "Employee List". Refer to Figure
1.
-
To create the pay for all
employees do not filter the "Territory", "Branch", "Cost Centre" or
"Employee".
-
Update Employee Rate - "Update Employee Rate" if enabled will update
the employee's pay rate with the back pay rate. The rate is changed at:
-
Employee rate and effective date is
updated under "Linkweb - Employee Profile - Employee Maintenance".
-
Employee Standard Pay rate is
updated.
-
Rate on the payslip is updated.
-
Save. Click the "Floppy Icon". This
will compute the back pay schedule with status as "Active". Refer to
Figure 1.
-
The initial status of the record
will be "Queued". Background process "SYS001" will compute the pay
values.
-
The status will be updated to
"Active" once the pay has been created.
-
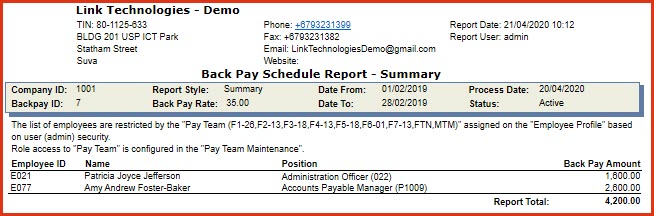
Users can generate the "Back Pay
Schedule" report to view the pay components. Refer to Figure 3.
-
Edit Back
Pay - Users will be able to only
edit "Active" back pay schedules.
-
Click on the "Grey Arrow" to expand
into the details of the schedule. This will list the employees in
the schedule.
-
Expand the employee record.
This will load the Back Pay details for the selected employee, users can
edit the "Back Pay Amount" or payroll "Paycode". Refer to Figure 2.
-
Click on the "Create
Pay" button to create the
back pay.
-
When a pay is created from "Back Pay" the pay
type is "Special". Configure the rules
for the "Special" pay type under Payrun Type Configuration
before creating a back pay. Only
the configured values will populate in the back pay.
-
Back Pay schedule status be closed and
updated as "Completed" once the pay is created.
-
Pay record can be reviewed under
"Linkweb - Payroll Processing - Pay Processing".
-
-
The notes is updated with error log
during pay processing.
Figure 1: Back
Pay Schedule
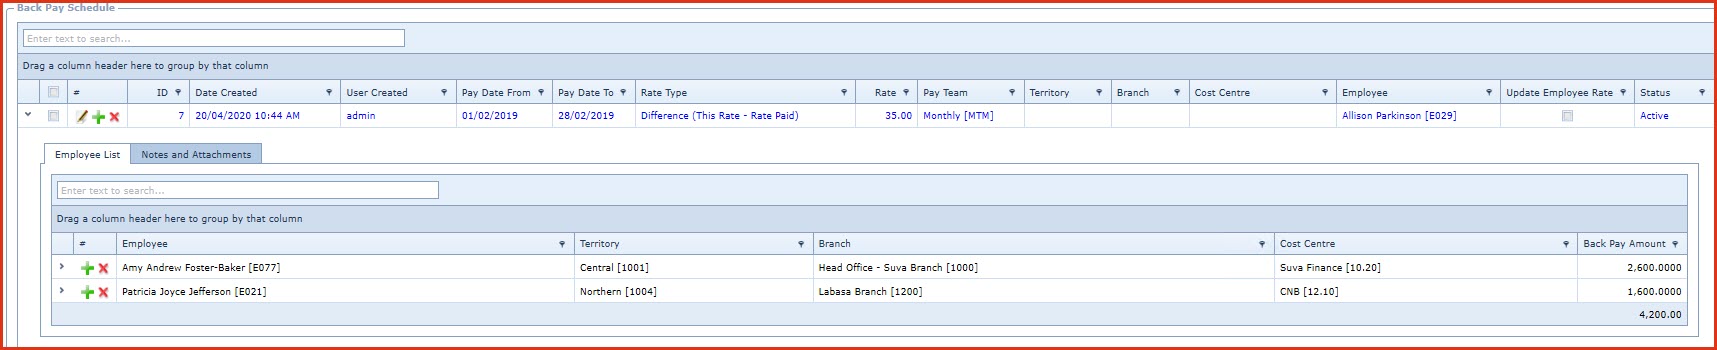
Figure 2: Edit Back
Pay
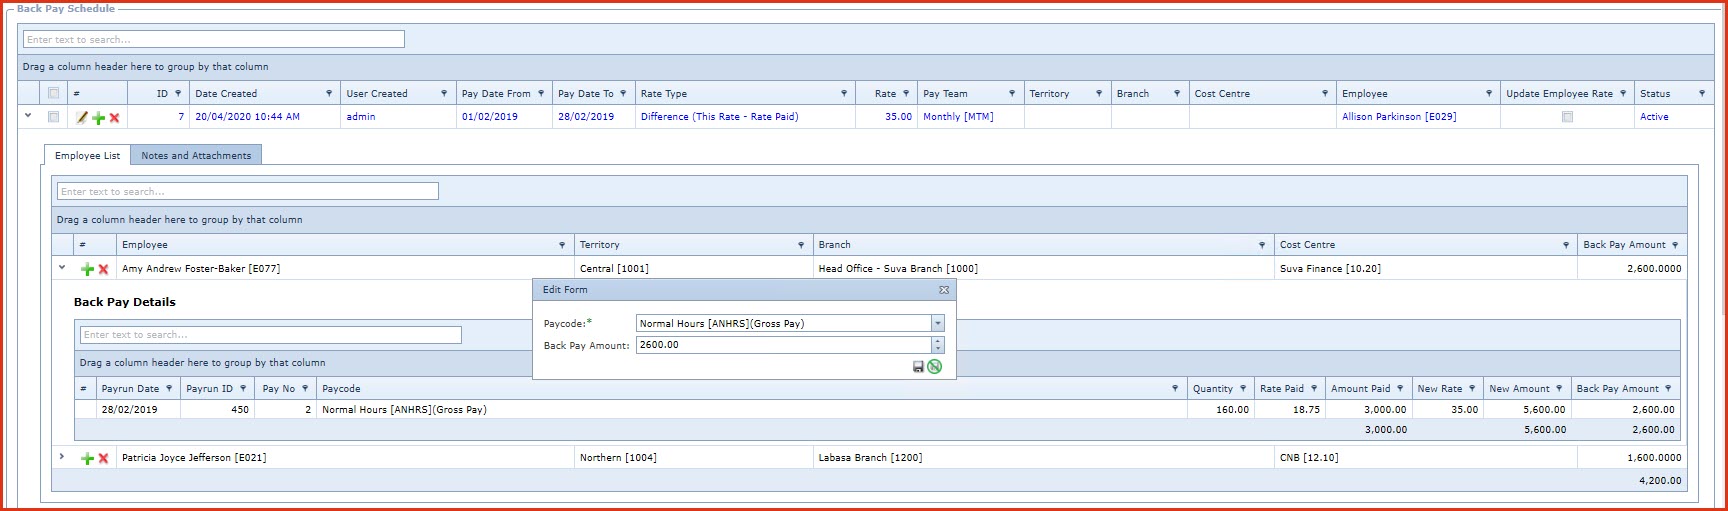
Figure 3 :Back Pay Schedule Report