

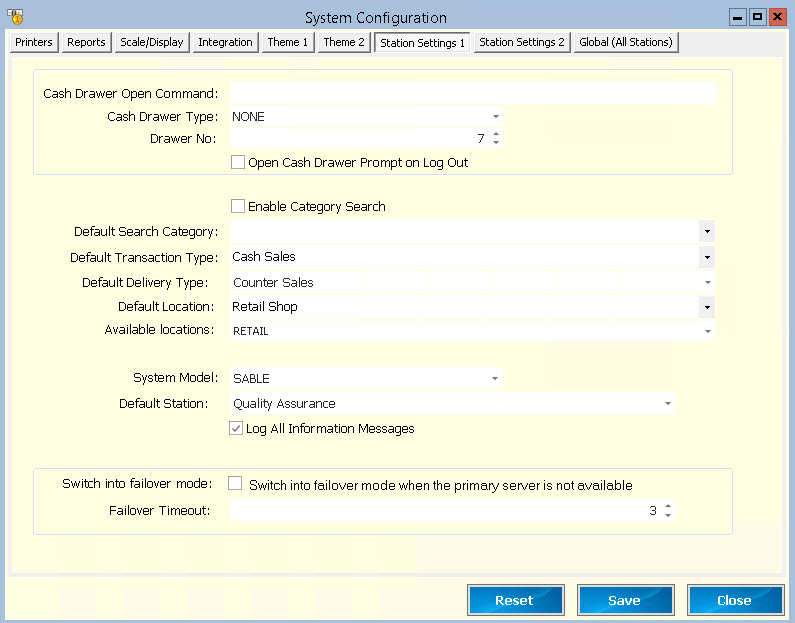
Generate Setting 1 contains below configurations
Figure 1: General Setting 1
|
|
Description |
|
Enable Category Search |
Enable
this field when you want to search items by categories. This is quite useful
when assigning shortcut keys in the POS screen where the items are
categorized by different groups. |
|
Log All Errors and Messages |
Every
time an error occurs within POS processing or a wrong item is scanned, this
will get logged in the LBS_Log table. |
|
Show location on Grid |
Enable
this field if you want to see the location on each line item. This option is
usually used when an item is bought from one location and delivery is from
another location. The cashier can change the location code on the line item
and this location is where stock will be reduced from. |
|
Enable Touch Screen |
If
this field is enabled, the system will load a SOFT KEYBOARD whenever user
entry is required. |
|
Force Delivery Option |
If
this field is enabled, the system will load the Delivery screen whenever a
Customer is selected in the Customer field in POS Processing Screen. |
|
Allow Edit Misc
Items |
If this
field is enabled, the user is able to edit the description for miscellaneous
items (set as a Non Quantity Bearing item in the Product Master) when
the item is selected in the POS processing screen. |
|
Group POS Line Items |
Enabling
this field groups items in one line rather than creating multiple lines when
an item is scanned or selected more than once for processing. |
|
Load Map Layout |
Enable
this field for the Map Layout Matrix to be loaded for the cashier to select
the cells when item description is clicked. |
|
BI Fast Build Processing |
Enable this
field when you want the BI Build View to have fast order status change process.
In fast processing, the user clicks on the “New Order” button and the
status changes to READY and DELIVERED instead of a pop-up window. |
|
Default Search Category |
The
user can set the default search category by selecting the category from the
drop down list. When assigning shortcut keys, the items tagged to the
category which is set as the default search category will be displayed in the
search screen. |
|
Cash Drawer Type |
Select
the type of cash drawer used. This can be either a USB cash drawer which is
plugged directly to the machine through a USB port or a cash drawer which is
plugged to a printer. |
|
Drawer No |
Enter the number of the drawer. |
|
Cash Drawer Open Command |
This
is batch file which is normally supplied by the cash drawer suppliers. This
is used to open the cash drawer. |
|
Default Transaction Type |
When the cashier logs into POS, the default transaction type selected in
this field will show in the transaction type field. Other types of
transactions are Credit, Lay By, Quotation and Return. |
|
Company Code |
Enter
the Company Code to identify the company POS Processing is carried out for if
there is multiple Companies setup. Company setup is done in the Organisation
Maintenance Menu (Menu ID: 211). |
|
System Model |
The
system model entered in this field is used to setup Customer Display as
different models are setup differently like IBM POS 500, SABLE and others. |
|
BI Auto Remove (min) |
This
is used in BI Build View whereby the orders appearing on the screen will
automatically be removed from the screen depending on the minutes configured
in this field. Therefore there is no user intervention to manually change the
status as the orders are processed. |
|
BI Flag Time (min) |
The
BI Build and Customer view shows the duration it takes for an item to be
ready. Once the duration exceeds the specified time configured in this field,
the duration column changes colour to blinking red
notifying the cook that the expected time of delivery has exceeded. |
|
BI Refresh Interval (sec) |
The
number set here will refresh BI screens at this interval, for example, if the
Refresh Interval is set to 10, BI Screens will be refreshed with any new
transactions after every 10 seconds. |
|
Picture Button Tag |
The
name of the picture button appearing on the POS screen is configurable. The
user can modify the name of the picture button specific to their business and
the items which are assigned within this menu button. |
|
Image File Location |
Location
where Picture Group Screen images are stored. |
|
Available Locations |
Locations
that the cashier can choose from POS when making a sale. |
|
Default Location |
Default
location to assign when the POS Screen is loaded. |
|
Report Location |
Location
where POS reports are stored. |