-
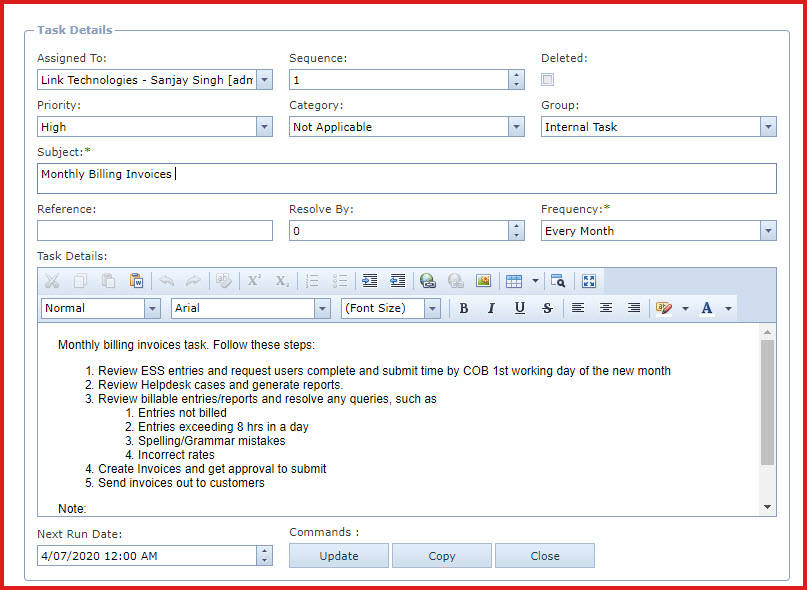
Assigned
To - Select the user who is needs to manage the task.
-
Users are maintained under
"Linkweb - Global Administration - User Maintenance"
-
Sequence - Define the sequence in which the
tasks should be generated. The sequence will be applied only of the
sequence is enabled in 2.8 above.
-
Priority -
Select the priority for the task. If users do not select a priority, the
priority will be updated with default priory from 2.3 above.
-
Category -
Select the category for the task. If users do not select a category , the
category will be updated with default category from 2.4 above.
-
Group -
Select the group for the task. If users do not select a group , the group
will be updated with default group from 2.5 above.
-
Subject -
Enter the subject to describe the task.
-
Reference
- Enter referential details
-
ETC Due
Days - Enter the "Expected Completion" date of the task. This is date by
which the user should have completed the
work.
-
Frequency
- Select the frequency. A new helpdesk call will created an assigned to
the user for action based on the selected frequency.
-
Frequency is maintained
under "Linkweb - Company Administration - Frequency".
-
Task
Details - Enter the task details. In the Task Details,
clearly explain the steps needed to perform the task. This should be Step
by Step instructions, including any relevant references to external
documents,
-
Next Run
Date - Set the next date and time at which the task should be
scheduled
-
Save.
This will create a record for the task.
-
The background process
"Generate Tasks" will created the scheduled tasks.
-
Click on the "Edit" link to
make changes.
-
Users can "Copy" a task.
Click on the "Copy" button and "Save" to create a copy of a
task.